

Create Laravel Project
- Nov 10, 2022
- 2 min read
Updated: Dec 12, 2022
Step 1 - Create Project
Before creating laravel application ensure php and composer are installed.
Type the below command at the terminal to create contactaap laravel aplication.
laravel new contactapp
After the project has been created, it is ready for development.
cd contactapp – lead to application folder
Step 2 - set up database details in .env file
.env file - It is Laravel default file that contains environment setup such as database credentials, cache and drivers. These values are then retrieved from various Laravel configuration files within the config folder.
I have opened .env file and I added the database credential as you can see in below image.

Step 3 - Install Laravel UI
Laravel provides tools that allows users to implement authentication quickly, securely and easily. Laravel 8 mostly offer packages like Laravel breeze, Laravel Fortify and Laravel Jetstream. However, I am going to use Laravel Ui package for authentication in this project.
Laravel/ui package easily scaffold all routes and views for those in need of authentication; it also generates several pre-built authentication controllers that handle different requests.
To install the Laravel/ui, I have typed the below command into the terminal inside contactapp folder.
composer require laravel/ui
to make sure Laravel/ui is installed, I have typed the command below in terminal.
composer show laravel/ui

Step 4 - Creating Auth Scaffolding
php artisan ui bootstrap --auth
php artisan ui vue --auth
php artisan ui react --auth
I have more than one option but, for this project, I am going to use bootstrap
php artisan ui bootstrap --auth This way I will create bootstrap scaffolding.
Through php artisan ui bootstrap --auth Laravel/ui package scaffolded all of the routes and views that I needed for authentication and put them in the resources/views/auth directory.

Laravel/ui also created application layout and placed it in resources/views/layouts.

Step 5 - run npm install and npm run dev command
npm install && npm run dev
npm run dev is an alias for the npm run development command. It is used to compile the JaveScript and CSS files written for application.
Note: sometimes the command fails to fulfil the action. In this case, the solution is to retype and try again and it will work.
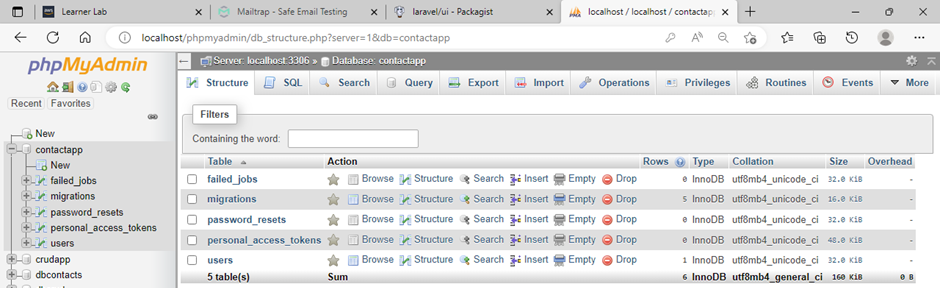
Step 6 - Database Migration
The Laravel Schema facade provide comprehensive support for database in order to create and manipulate tables across all of Laravel database systems. Laravel migration is very handy, without get to database console or run any SQL queries the user can quickly delete and recreate tables. the migration structure include two methods up and down. the up method is using for add new table or columns into database, while down method reverse the operations performed by the up method.
By typing the below command, Laravel itself creates the user's table, password_reset table, personal_access_tokens table and few other tables.
php artisan migrate
Middleware
Middleware's are in the app/Http/Middleware folder. Laravel framework carry several middleware including for authentication and CSRF protection. Middleware inspect and filter HTTP requests entering application. It verifies the user authentication; however, if the user is not authenticated then the user will be redirected to login page.


Comments